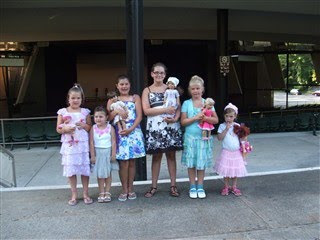
Last week was my first time at the New York City Ballet at SPAC (Saratoga Performing Arts Center), a large outdoor concert venue in our city. I've always wanted to go to the Ballet but have never quite made it up until now. The reason? My 5-year-old is obsessed with anything ballet, ballerina, tutu or ballet slippers. Just loves 'em. And is getting ready to take her first dance lessons. Well, this evening turned out to be another great night of Entertainment Without Money. It turned out our Entertainment book had some wonderful coupons - the first Get A Complimentary Ticket when another Ticket is purchased (Adult Lawn tickets were $18) and An Adult goes Free when taken to the Ballet by a Child. Price for a child's ticket was $5. Well, by the time we finished getting our gaggle of girls together, this became an Girls' Night Out. It was also American Girl Night at the Ballet so there were fun crafts and activities for the girls to do before the ballet and complimentary iced tea for iced tea parties on the lawn. Ella and I were able to go for $5 for the both of us. Everyone else who attended paid anywhere from $5 for 1 or 2 or $9 for a single adult. Both of Ella's grandmas attended as well as both of her favorite Aunties. Plus several friends with their Moms. It was such a fun evening....but before we went I decided to do something special for the night. At first it was only going to be for the little girls but I ended making them for all the grown-up Girls, too. So I can't credit any ONE single person with this idea or not credit anyone with this idea either. It is a conglomeration of reading many, many crafty/frugal/creative blogs all winter long. Here is what I came up with:
First I bought some tulle at Wal-mart. A yard of white and a yard of hot pink for 97 cents per yard.
When I came home I folded my tulle in half and in half again and again and again and again and then I cut circles out of it. I was trying to save time so I tried to cut as many circles as possible with each cut.
Then I layered the circles on top of one another alternating pink and white here and there. All of my circles were not the same size and my alternating wasn't quite perfect either. Tulle is a little slippery to work with and this was my first time so I did the best I could.
Next, I made little piles of tulle circles and picked them up with a tweezer. I held them above a lit votive holder to melt the edges a little. It crinkles up the edges and makes the tulle sit a little "puffier." Be careful not to hold the tulle too close to the flame as I did on my first time around. I started a small tulle fire in my votive holder and burnt tulle really stinks up the house!
Okay, so I got them a little melty and crinkly and then I took out my package of buttons. I bought a pack of these pastel buttons at Wal-Mart for $1.97. There are something like 150 buttons in a pack.
I just picked a button, stuck it in the middle, and hand-sewed the button to the middle of my circles. Sewing it made them gather up a little, too, giving them a slightly more 3-D effect. It took me all of an hour and half to make these, cost me about $4 in materials, lots of which I have left over and I made 18 corsages. These are the end result.
And here's a picture of us all wearing out corsages ~
Steph, our Mom, and me (Ella made me a wear a dress)
Some of the girls have their dollies wearing them instead!
My Mother-in-law & Sis-in-law
A double your pleasure post: craftiness and thriftiness all in one. I'm so proud!
This post is linked up to


Very cute and easy. I think you could use these to embellish so many things. Happy Monday.
ReplyDelete~jan @ The Paisley Cupcake
Visiting from Skip to My Lou
These are so sweet! I love the cute buttons you used.
ReplyDeleteSweet and simple - great job!
ReplyDelete